Monday, September 8, 2008

My Current Obsession: The Splendid Table

When my new iPod Touch arrived in all of its glory, one of the first things I did was take the advice of my college-age daughter--I packed my pod with podcasts from every source I could think of. One of the great gifts that fell into my favor is The Splendid Table, an American Public Media program described as "the show for people who love to eat," and indeed it is. One listen to TST and I was hooked, making my way through the archives at lightning speed while folding laundry, driving in my car, or walking on the trail. TST features fascinating segments on all things food, whether it's the locavore movement, the food scene in Moscow, eating to increase your longevity, improvising dishes, or roadside diners along The Mother Road, Route 66, the potential for learning and bringing something new and lasting to your own table is practially bottomless. Even the philosophy that comes from TST is astounding, and I often find myself nodding my head in agreement when I hear guests spouting wisdom, such as this tidbit by Neal Rosenthal, wine merchant and author of the book Reflections of a Wine Merchant:

"We passed through a period of a decade or so where people gave up their right to choose. We became a bit slavishly entrapped in a media process which is to say that people would give over their choice of selecting to things that were praised in the press, but I sense there's a revival of all things artisan.We appreciate what values this brings to our life and our culture."
This bit of wisdom was in reference to consumers' wine choices, but it could be applied to all foods. We, as an American culture, are in danger of allowing mega-stores to make our food choices for us. One look at a natural foods distributor's catalog and we begin to see what foods we're missing, what we won't find at our local Everything*Mart chain. Things like Greek yogurt, heirloom tomatoes, truly artisan breads and cheeses, high-quality baking products, fair trade chocolates and beverages are not available in these places, and if they are, their quality will likely diminish, their power to choose their growing practices decrease, and the cost of transporting will continue to rise. And once they're the only guy on the block, what they choose will become what we choose, and our local farmers, dairy producers, bakeries, winemakers, and orchards will suffer and, eventually, disappear. We will shop ourselves right out of our choices, and right out of our unique communities.

And if you think this isn't important, think about this piece of information by Dan Buetter, author of The Blue Zones, Lessons for Living Longer from the People Who've Lived the Longest, also a guest on TST.
"Food plays about 25-30% of longevity. All of the longest-living people eat mostly plants. Gardening is an ideal longevity activity because it reduces stress, uses the range of motion, and you emerge with organic vegetables. Having a sense of purpose, to know why you wake up in the morning, you're going to eat better food, exercise, and be more engaged with the world."
What we choose to eat, how we grow it, how we harvest it, and how we feel about our purpose in life are three major contributors to living a long and healthy life. Do we feel a sense of purpose by buying our foods from a mega-store shelf? Do we contribute to the sense of purpose of others by purchasing items that are not fairly produced? Do we have a first-hand (literally) part in producing our own foods straight from our garden, which increases our physical health in multiple ways, from getting fresh air, gentle stretching, contact with the earth, and receiving the ultimate in fresh foods?

But there is more than food philosophy on TST. They bring practical tips to the table, too. Recipes and cooking tips abound. Just listening to charming host Lynne Rossetto Kasper's ideas on improvisation has inspired me to step outside of my cookbook-bound comfort zone to create dishes that rely on what I have in my garden and in my community. Here's a spin on Lynne's suggestion for a potted chicken, as given on the August 1st show in response to a call-in guest's request for suggestions for a braid of garlic.

Potted Chicken

1 locally-raised, free-range (preferably organic) roasting chicken
6-10 whole heads of garlic, rinsed, cut in half side-to-side (giving a cross-section look). Remove any loose papery skin, but leave heads as much intact as possible
4 large lemons
4 large onions, sliced
olive oil
kosher salt
fresh-ground pepper
fresh sprigs of rosemary
heaps of baby carrots or cleaned carrots cut into small chunks
handfuls of chunked potatoes, either Yukon Gold or red-skinned potatoes

In a dutch oven, lay the sliced onions and 4 of the cut heads of garlic. Salt and pepper the chicken very generously inside and out. Remove the rind from the lemons and cut them in half, or scoop out the lemon pulp. Stuff the chicken with the lemon pulp, several more of the heads of garlic, more onion, and then sprinkle in more salt and pepper and a few sprigs of rosemary.

Top the whole thing with as many heads of garlic, slices of onion and sprigs of rosemary as you like. Tuck as many carrots and potatoes as you would like or can fit around and on top of the chicken. Sprinkle with more salt and pepper and more rosemary sprigs. Drizzle with olive oil.

Bake, covered, in a 350 degree F oven for about 3 hours. The chicken will literally fall off of the bone. Dig the garlic heads out, scoop the buttery-soft garlic out of the skins and spread on the chicken or on pieces of crusty bread, like the No-Knead Rosemary Bread or Genovese Basil Bread. Serve the carrots and potatoes on the side. When you've finished the meal, separate the chicken from the bones and skin and use it later for delicious chicken salad. Transfer all of the garlic pulp, juices and soft onions to another container and use it for a stock base or a fabulous gravy for your next batch of mashed potatoes. If you're lucky enough to live on a farm, feed all of the bones and skin to your pig, which you'll eat later!

And be sure to check out The Splendid Table. You'll thank me.
Easy enough for a child to make...

What's a great project for a child on a cool fall morning? No-knead rosemary bread, of course!

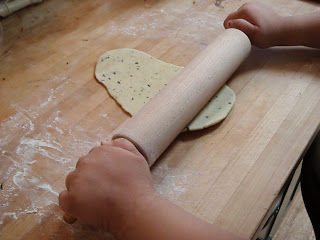
13 year old Monet, 9 year old Sweetheart and 5 year old Baby made their rosemary bread with verbal help from mama, from determining the right temperature of the water (warm, not hot or cold), to the measuring of the ingredients, to the harvesting of the rosemary, to the slathering on of the olive oil (what fun!) and finishing up with the eating of the final product. Monet even improvises a dipping oil which I will have him post for your enjoyment later this afternoon.

In the meantime, enjoy the photos of my previously posted No-Knead Rosemary Bread!


Mixing the yeast into the warm water.


Measuring the flour and salt.


Snipping in the fresh rosemary.

A pleasant goo.


After rising.


Place it in baguette pans, or...

...a cast-iron skillet (or other baking pan/dish), slather with olive oil, then sprinkle with kosher salt.

Snip some more rosemary on top.


Bake until golden brown!

It's not a tall loaf. Think of it as more of a thick foccacia.

Spread with real butter or dip in an olive oil mixture...

...and enjoy!

Wednesday, August 6, 2008

Another No-Knead Recipe: Rosemary Bread

When we host houseconcerts, we ask people to bring along a healthy snack, whether that means a bowl of fruit, a tray of veggies, or their homemade Italian Eggplant Caponata. Often, people will bring their signature dishes, and it's not unusual to find the kitchen butcher-block buffet heavy with likes of a fabulous vegetable curry, espresso chocolate chip cookies, homemade cheeses, and delicious breads.

During one particular concert, the musician made a point of thanking the guests for loading him up with such exceptional foods, and he said that he didn't want to exclude anyone, but that the rosemary bread was just to die for. Indeed it was. It took me a while to ask for the recipe, but now that I have it, my rosemary plants are in danger of being stripped bare.

This is similar to Daniel Lahey's No-Knead Bread, but this one requires no kneading at all and only takes a little over two hours, start to finish, to make. I can imagine you could use other herbs, if you like, and I plan on trying it out with basil, tarragon or oregano.

This dough is extremely wet, so if you end up with a big, gooey mess after the mixing and the first rising period, you haven't done anything wrong. Just grease up your hands before you pull the mass from the rising bowl, and make sure you oil your baking pan well before slopping the dough onto it. Make two batches. You'll be glad you did.

#`~~`~`#3#3###----#`~~`~`#3#3####`~~`~`#3#3###`~`~~`#

No-Knead Rosemary Bread
Courtesy of Sonia S.
(makes 2 loaves)

2 cups warm water
2 teaspoons instant yeast
4 cups flour (I use bread flour, but you might be able to use all-purpose flour)
2 teaspoons salt
Extra virgin olive oil
A handful of fresh rosemary, hard stem removed and chopped
Kosher salt

Mix yeast and water in large bowl. In a separate bowl, stir together flour, salt and a small handful of chopped rosemary. Add to yeast and water. Blend with a spoon until mixed and the dough pulls away from the edges of the bowl (will be gooey). Cover and let rise for 1 hour, 20 minutes. Grease a cookie sheet or two-loaf baguette pan with olive oil. Grease your hands and dump the dough into two loaves, forming rough elongated loaf shapes with your hands. Pat with olive oil, sprinkle with chopped rosemary and a dusting of kosher salt. Bake at 350 degrees for 20 minutes and then at 375 degrees for 20 minutes.

Serve with delicious pesto, butter, or olive oil mixed with fresh basil, crushed red pepper, crushed fresh garlic, a bit or oregano and kosher salt to taste.

Let me know what you think!

Wednesday, July 9, 2008

Cooking in Cast Iron.

The post for Lahey's No-Knead Bread was linked on Cooking in Cast Iron. It's a very interesting site, so please go check them out!

Photo from Cooking in Cast Iron.

Sunday, July 6, 2008

No-Knead Bread--The Trend Makes It to the Sticks

After church this morning, I walked up to my friend Susan to ask if she'd be interested in splitting a case of bread flour through our church co-op, and she asked me if I'd tried the No-Knead bread recipe. My jaw dropped. How had she known? Just the day before, I'd finished serving the last bits of my first No-Knead Bread venture, and it was definitely a big hit. "It's making its rounds," she said. Well, yeah, but why did it take me so long to find out about it?

The No-Knead bread recipe was first published in the New York Times, and republished everywhere (many people feared they'd take away the link or start charging for it). There have been corrections, updates and adaptations everywhere, including the Almost No-Knead Bread Recipe put out by Cook's Illustrated, which includes many variations--The Olive, Rosemary, Parmesan looks the most appealing to me, but you have to have a subscription to see the recipe. It appears that the first printing of the NYT version had a misprint, that there should be only a cup and a half of water, not one and 5/8 (who has a 5/8 measuring cup, anyway?) and I wondered, too, if the water had to be warm, or room temp, or did it even matter? As if that's not enough, there seems to be some debate about the definition of "instant" yeast. I used what I normally use, SAF-instant yeast, which I buy at a local bulk food store or through our co-op.

So, even with my minimal knowledge of the recipe, and my moderate amount of bread-baking experience, the final product was a great success.

This definitely qualifies as a recipe that takes time, but time is really all it takes. Everything else is buttah, as easy as...well, as easy as no-knead bread. Mix this up right before dinner, and you'll be ready to make it the next day for lunch. The only special equipment needed is a dutch oven, though it can be any kind of dutch oven--cast iron, ceramic, Pyrex, enamel--and cotton cloths.

So take some time, and make some bread.

....oOo....****^^^^****....oOo....

No-Knead Bread
Adapted from Jim Lahey, Sullivan Street Bakery
Time: About 1 1/2 hours plus 14 to 20 hours' rising

3 cups all-purpose or bread flour, more for dusting
1/4 teaspoon instant yeast
2 teaspoons salt
1.5 cups warm water
Cornmeal or wheat bran as needed.

1. In a large bowl combine flour, yeast and salt. Add 1.5 cups water, and stir until blended; dough will be shaggy and sticky. Cover bowl with plastic wrap. Let dough rest for 18 hours (yes, 18...12 will work, but 18 is the best), at warm room temperature, about 70 degrees.
2. Dough is ready when its surface is dotted with bubbles. Lightly flour a work surface and place dough on it; sprinkle it with a little more flour and fold it over on itself once or twice. Cover loosely with plastic wrap and let rest about 15 minutes.
3. Using just enough flour to keep dough from sticking to work surface or to your fingers, gently and quickly shape dough into a ball. Generously coat a cotton towel (not terry cloth) with flour, wheat bran or cornmeal; put dough seam side down on towel and dust with more flour, bran or cornmeal. Cover with another cotton towel and let rise for about 2 hours. When it is ready, dough will be more than double in size and will not readily spring back when poked with a finger.


4. At least a half-hour before dough is ready, heat oven to 450 degrees. Put a 6- to 8-quart heavy covered pot (cast iron, enamel, Pyrex or ceramic) in oven as it heats. When dough is ready, carefully remove pot from oven. Slide your hand under towel and turn dough over into pot, seam side up; it may look like a mess, but that is O.K. Shake pan once or twice if dough is unevenly distributed; it will straighten out as it bakes. Cover with lid and bake 30 minutes, then remove lid and bake another 15 to 30 minutes, until loaf is beautifully browned. Cool on a rack.

Yield: One 1 1/2-pound loaf.

Friday, July 4, 2008

Genovese Basil Bread

On a cool, rainy holiday when Toby is out working on the cabin and the garden weeds will wait until the sun comes up, baking bread is at its best. And when there's an abundance of basil in the garden, that's the time to make Genovese Basil Bread.

This recipe is made in a similar fashion to french bread, so you'll roll out the dough with a rolling pin and then roll each piece up jelly-roll style.

The recipe makes four small baguette-type loaves, so if you've got a hungry clan, you'll want to make several batches!

_o_ooo-*-***_o_ooo-*-***_o_ooo-*-***_o_ooo-*-***

Genovese Basil Bread

2 Tablespoons Olive Oil
2 Cups Fresh Basil Leaves, coarsely chopped and lightly packed
1 clove garlic, minced
1 package dry yeast
1 cup very warm water (105-115 degres F)
2.5 to 3 cups bread flour, plus a bit more for dusting
2 teaspoons salt
1/8 teaspoon freshly ground pepper

Heat oil in a heavy, large skillet (I love my cast iron skillets!) over low to medium heat. Add basil and garlic and stir for 1 minute. Remove from heat.

Dissolve the yeast in water in a small bowl. Let it stand for ten minutes.

Mound 2.5 cups of flour onto your work surface or in a large bowl (I use my stand mixer); make a well in the center. Add the dissolved yeast, basil mixture, salt and pepper to the well. Mix the ingredients that are in the well, and then incorporate the flour. Knead on a lightly floured surface until it's firm and elastic, adding a bit more flour if it's sticky, for several minutes (on 4 on your KitchenAid stand mixer for 10 minutes).


Place the dough in a large, oiled bowl, turning once to coat with oil, and then cover it to let it rise until it's doubled, about 45 minutes, depending on the warmth in the rising space.


Grease a baking sheet. Punch down the dough. Knead it on a lightly floured surface until it's smooth, about three minutes. Cut the dough into four pieces (or two pieces, for a longer loaf) and then roll one out on a lightly-floured surface to an 8 x 5 1/2" rectangle (longer if you're making two loaves instead of four).


Roll it up jelly-roll style, starting at one long end. Transfer to the greased baking sheet, seam side down, then do the rest of the pieces the same way. Cover and let rise for about 30 minutes, until the pieces are doubled.

While they're rising, preheat your oven to 450 degrees farenheit.

When the rolls have risen, slash them from one end to the other with a serrated knife and a confident hand. Bake them for about 30 minutes, or until they're golden in color and sound hollow when you tap on the bottom of a roll.

Voila!


And a finished product! Yes! Delicious with REAL butter!

Thursday, July 3, 2008

Growing!

The season is flying by, and the garden is shooting up! And even though there are a few snow peas on the vines, and I made my first chocolate zucchini cake of the season, and there are a few blossoms on the nasturtiums, I don't really feel like the garden is "ready" until the tomatoes are ripe and plump and plentiful.

But that doesn't mean the garden isn't plentiful already! It's bursting forth with loads of hollyhocks, tarragon, mint, parsley, swiss chard, rosemary and just the beginnings of a large crop of basil. The lettuce season is just about over, as is the broccoli and cauliflower, but I have yet to see a brussels sprout or eat a green bean, so we still have a long way to go (though I do see the sprouts starting to form and there are little tiny beans on the bushes!).

What else is in the garden?

Red Raspberries and Yellow Squash...

Plums...


Peaches...


Container Swiss Chard...


Hollyhocks and Scarecrows...

Radish-flavored Nasturtiums...


Lots and lots of tomato blossoms, and a few little bugs...

Bees...

And more bees...

Enough basil to feed and army...


Mammoth Snow Peas...


Climbing Nasturiums (well, you can't see them *yet* but they'll be there before you know it!)...


Red beets, yellow beets, cantaloupe and watermelon...


Fennel and flowers...


More and more and more zucchini (Did you ever hear the defnition of a person without a friend? Someone who has to go to the store to buy a zucchini!)...


And there's also Asian pears, kittens, blueberries, okra, pigs, eggplant, chickens, some heirloom melons, puppies, lots and lots of flowers, herbs and, of course, children. :-)

Tuesday, May 27, 2008

Random thoughts on a Spring day

With so much growing and changing in the garden, I thought now would be a good time to journal a bit about the garden goings-on.

Most of the garden is in, and I was even so bold as to put in my basil, tomatoes and peppers. I'll have to see if there's any good or harm in it. Normally, I plant my tomatoes so late that I'm the last one on the block to have any. Last year, I had some sort of a blight on my tomatoes so that I had none at all, with the exception of the cherry tomatoes, which seem to be indestructible.

Yesterday Zach and I sprayed the fruit trees with sulfur, copper and rotenone. It's the first time we've sprayed any of our trees; so far, we've had good fruiting but they're always riddled with curculio worms or other little beasties. Sometimes I can just cut the fruit away, but many times the fruit is no good because it has rotted from the center. I plan to keep up with the spraying until the fruit is ripe and see if this does any good. If not, we'll have to try some more aggressive organic methods. There are plenty of fruits on all of the trees, including the cherry, plum, peach and asian pear. After spraying the apple trees this year, I'll have to determine whether they're worth keeping. There are five of them, and they're about 20 years old, planted from the seeds of a single red delicious by the children who used to live on our hill. All of the trees are different--some worth eating, and some not--but I've not tried using them for sauce so far because they're so small and usually riddled with worms and fungus. One tree has decent eating apples, so that's the one we'll likely work on the most. One is a fabulous climbing tree, and that's the one the kids want to keep. This year should tell the tale a bit.

For the first year, I have an asparagus patch that can be picked from, but it seems to be slow coming. We've had a lot of wet, cool weather this year, so I don't know if that's why. The great news is that we also found a wild patch just down the hill in the fencerow last fall, and I've found the stalks again this Spring, so between all five spots, we should have some asparagus sometime soon!

We tilled under the cherry trees and I plan to plant watermelon and cantaloupe there as soon as the weather warms a bit. Tonight calls for a low of 47F, so we're creeping that way little by little.

We saw our first hummingbird of the season last week. As Toby and I stood on the porch, a sound like a small jet engine whizzed between us. The tiny bird made its way to my violas and took a few sips then landed on the fence for a moment, and then he was gone. It's time to add the hummingbird feeders to the others.

Toby has been busy putting an archway up leading into the herb garden. The original archway was given to me by my friend Joannie from her greenhouse, but it was in need of repair, so Toby bought some posts and is building a frame for the pieces. On top, he'll mount the farm bell we bought at auction a few years ago, and I'll add a few hooks for my hand tools.

I found this fabulous copper birdbath at my favorite thrift store and sat it on top of a stump. A few floating candles will make this a real treat this summer.

Zach has been working on making a stone patio and pathway, but it will come bit by bit. The stones were from Freecycle, so we'll have to wait until we find another good deal on them before we continue the project. Anyone with extra flagstones can send them my way!

Taylor has been working hard in her perennial garden and is pleased to find new things emerging every day.

Well, it's time to head back out and put in some beets, arugula and scallions.

Get out there and garden!